A one-second delay in page load can cut conversions by 7% — and large, unoptimized images are often the cause.
Knowing how to optimize images for web performance ensures your website loads quickly, ranks higher on Google, and keeps visitors engaged. Optimized visuals don’t just look better; they improve accessibility, reduce bounce rates, and support long-term SEO growth.
Here’s how to optimize images before uploading them to your website — without losing quality.
What Is Image Optimization?
Image optimization means reducing file size and adjusting dimensions so that your visuals load fast while still looking sharp. You can optimize images for the web by:
- Choosing the right file format (JPEG, PNG, or WebP)
- Compressing files without losing quality
- Adding descriptive alt text
- Using lazy loading to delay offscreen image loading
The main goal is straightforward: reduce the data your visitors must download, allowing your pages to load quickly and look great on both desktop and mobile.
Why Do You Optimize Images?
Users have little patience online: if your website doesn't load within two seconds, many visitors will leave and not return. Unoptimized images are often the primary reason behind slow-loading pages. This directly causes frustration, higher bounce rates, and lost sales.
Slow websites are also costly. Around half of visitors browse on mobile devices, and large images mean longer load times and potential customer drop-offs.
Additionally, slow load speeds hurt your visibility on search engines. Google uses site speed as a ranking factor, meaning unoptimized images can lead to:
- Fewer pages indexed
- Lower search rankings
- Fewer potential customers
Optimizing images improves user experience, reduces storage costs, boosts SEO performance, and enhances overall website efficiency—all of which benefit customers and your business's bottom line.
How To Optimize Images for the Web
It involves adjusting their file sizes, dimensions, and quality to speed up your website without compromising visual clarity. So, knowing how to optimize images for page speed involves a few essential steps that keep your site user-friendly. Let's go over each one.
Choose the Right Image File Type
Once you've created or edited images, you'll decide how to save them. Selecting the right file format significantly affects your website's speed, image quality, and user experience. Here are the main image formats to consider:
- JPEG is the most popular format online. It is ideal for photos or detailed images because it maintains quality while keeping file sizes small. However, JPEG doesn't support transparency.
To further enhance loading, consider exporting JPEG images as Progressive JPEGs—these initially load as lower-quality placeholders before the final high-resolution image fully appears. - PNG: Use it for images requiring transparency or sharp text graphics, logos, or icons. Unlike JPEG, PNG offers "lossless" compression, which means image quality remains perfect even when compressed. Save as PNG-24 for the highest quality or as PNG-8 when fewer colors won't affect image clarity.
- GIF: These are commonly used for animations and short demonstrations. They support only 256 colors, which limits their visual detail. While useful for quick, simple animations, GIFs are increasingly being replaced by optimized video formats like MP4, which offer higher quality without heavy file sizes.
- WebP: This format is gaining popularity because it offers better quality with smaller file sizes than JPEG or PNG. However, compatibility with older browsers can be an issue. If your audience primarily uses modern browsers, consider using WebP.
Carefully selecting image formats ensures quicker load times, improved SEO, and a better visitor experience.
Resize Your Images Before You Upload
One simple yet essential step in image optimization is resizing your images before you upload them. Correct resizing significantly reduces load times without sacrificing visual clarity, enhancing visitors' browsing experience.
For businesses managing large volumes of website content, an uploading and publishing service can help ensure that optimized images are uploaded correctly and consistently across all pages, reducing the risk of oversized files that affect performance.
If your website's image container is 200x200 pixels, upload an image sized precisely at 400x400 pixels for clear display on high-resolution screens (like mobile phones or Retina displays).
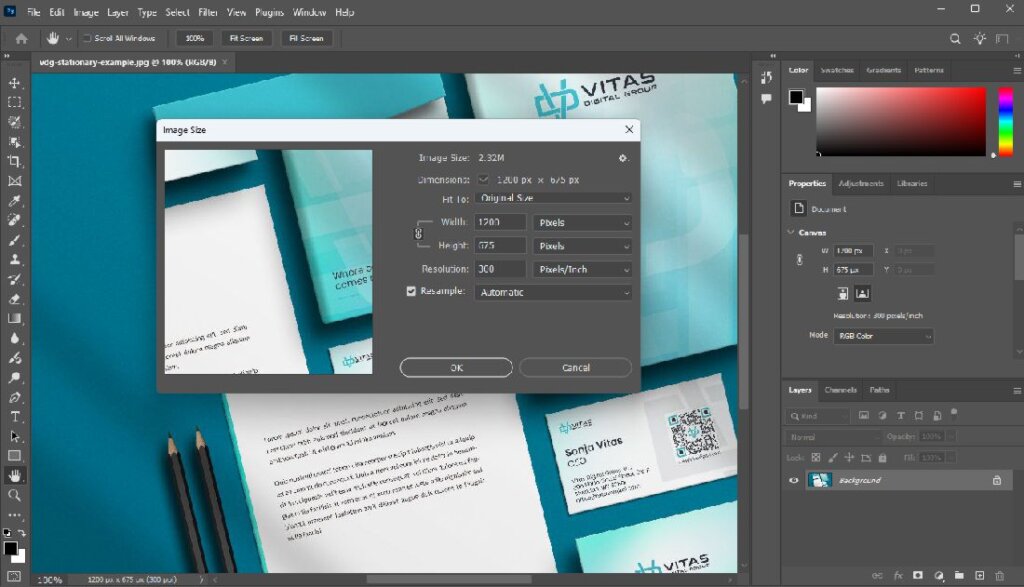
Image resizing in Photoshop
Today's mobile devices typically have a pixel density of at least 2x, meaning you'll always need images about twice the intended display size to maintain sharpness. For example:
- Intended size: 300x300 pixels → Upload at 600x600 pixels.
- Homepage banner (1200x400) → Upload at 2400x800 pixels.
Uploading overly large images—for example, a 1024x1024 image for a spot meant to display at 500x500 pixels—is unnecessary and slows down your site. Resize images directly in editing software, such as Photoshop, Canva, or free tools like Pixlr, before uploading them.
Correctly resizing images ensures your pages load faster, improves your SEO rankings, and delivers a better overall experience to site visitors.
Compress Your Images
After selecting the perfect image format and resizing it properly, there's another crucial step—image compression. Compressing images reduces their file size without any visible loss in quality, allowing your website to load significantly faster.
There are two compression types:
- Lossless compression: Shrinks file size without losing any image quality. It is ideal for images requiring crisp clarity, like logos or graphics.
- Lossy compression: Reduces file sizes dramatically but may slightly lower image quality. It's best for photos where minor quality loss isn't noticeable.
Compression is likely the solution if images appear slowly or load in chunks.
Tools for Image Compression:
- TinyPNG: Free, browser-based, and efficient for PNGs and JPEGs.
- ImageOptim (Mac): Easy, drag-and-drop tool, ideal for bulk compression.
- JPEGmini (Paid): Excellent at significantly reducing JPEG sizes without noticeable quality loss.
- Image Optimizer Add-on (Local): Automatically compresses images in your local development environment.
Compressing images ensures quicker website load times, a better user experience, and a higher likelihood of converting visitors into customers.
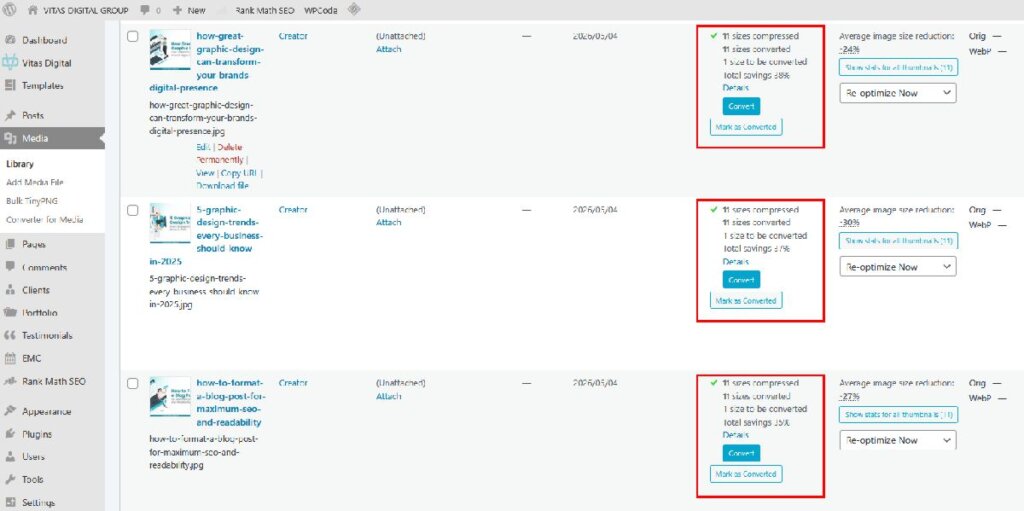
TinyPNG compression report example in WordPress
Use Image Sitemaps
Many images on your website might be invisible to search engines if they're not clearly defined in your site's code. Web crawlers from Google, Bing, and other engines rely on image sitemaps to find and index images efficiently.
If you skip image sitemaps, crucial images—especially those loaded via JavaScript or lazy-loading—might never appear in image search results. This means lost organic traffic and missed business opportunities.
An image sitemap lists URLs of important images, guiding crawlers directly to your visuals.
Key points:
- Web crawlers only index images explicitly mentioned in your webpage source code.
- If your images aren't mentioned directly, list their URLs in a dedicated image sitemap.
- Insert the sitemap location clearly in your site's robots.txt file.
Tip for Shopify users: Shopify automatically creates an image sitemap, indexing product photos and essential visuals from blogs or collections pages. This helps you effortlessly improve search visibility and drive organic traffic.
Lazy Load Your Site Images
Lazy loading means your website loads images only as visitors scroll down, rather than all at once. It assumes users will spend time engaging at the top of the page first, so there's no reason to load images they can't see immediately.
This technique dramatically reduces initial load time, improving perceived speed and enhancing user experience, especially for mobile users or those on slower connections.
Key advantages of lazy loading:
- Faster initial page loads: Users see content instantly, keeping them engaged.
- Better website performance: Reduces unnecessary bandwidth use.
- Improved user experience: Visitors don't wait for images they haven't reached yet.
Add Alt Text
Alt text (alternative text) describes your images in short, clear phrases, improving SEO rankings and user experience. It shows up if images fail to load or users rely on screen readers, ensuring your content remains accessible.
How to do it right? Always use accurate, simple descriptions without keyword stuffing; for instance, use "wireless Bluetooth headphones model X123" rather than overly promotional phrases.
If relevant, include product model numbers or serial numbers and keep descriptions concise. Also, avoid alt text for decorative images to maintain SEO relevance and readability.
Test Your Images
Optimizing your images isn't just about faster page speeds and better SEO—it's also about increasing conversions by testing which visuals encourage visitors to buy.
Testing helps you discover exactly what your customers prefer:
- Number of images per product: Try reducing or increasing the number of product images you display. A lower number might boost load speed and improve conversions, while more images could enhance engagement.
- Images per category page: Experiment with the number of product listings appearing per page—whether 10, 20, or more. The ideal number balances quick loading with a comfortable browsing experience.
- Customer preferences: Regularly survey customers to understand which product images they prefer. This direct feedback helps you create engaging visuals tailored precisely to your audience.
Consistent testing ensures your image strategy aligns closely with customer preferences, bringing higher click-through rates, better conversions, and a stronger competitive advantage.
Ready to Optimize Images for Your Website?
You need the right skills—smart resizing, compression, lazy loading, and SEO-friendly alt text.
Do you lack tools or expertise? Our team has helped 150+ clients optimize images for speed, rankings, and conversions. Book a free consultation, and let's do the same for you!